
At its core, a Safe Work Method Statement (SWMS) is a practical, on-the-ground safety plan for high-risk jobs. It is not just more paperwork. In Australia, a SWMS is a legally required document that breaks down a specific high-risk construction task, step-by-step, flagging potential hazards and spelling out exactly how to control them. This guide provides an in-depth look at how to create and implement a compliant safe work method statement.
What Exactly Is a Safe Work Method Statement?
Think of a Safe Work Method Statement (SWMS) as a detailed recipe for carrying out a dangerous job safely. It’s a proactive tool that turns vague safety ideas into a clear, actionable plan. Instead of just listing what could go wrong, a SWMS shows workers how to do the job in a way that minimises those risks. It ensures everyone on the crew knows their role and what's expected of them to keep themselves and their mates safe.
This document is a cornerstone of workplace safety laws here in Australia. Under the national Work Health and Safety (WHS) Regulations, a SWMS is mandatory for 18 specific types of high-risk construction work. This structured, hands-on approach is a key reason Australia's work-related injury rates are significantly lower than many other developed nations. It’s a proven tool for preventing harm by planning safety into the job before it even starts.
Clarifying Its Unique Role
It's easy to get a SWMS mixed up with other safety paperwork, like a general risk assessment or a Job Safety Analysis (JSA). While they're all related, they have very different jobs.
A risk assessment is the broad-stroke process of identifying all the potential hazards across an entire workplace. A SWMS, on the other hand, is a legally required document that zooms in on a single, specific high-risk task. You can learn more about the difference between a JSA and a SWMS in our detailed guide.
Essentially, a SWMS takes the hazards identified in a risk assessment and creates a clear, sequential set of instructions for getting a high-stakes job done safely. This targeted, practical focus is what makes it so powerful.
SWMS vs General Risk Assessment at a Glance
A simple way to think about it is that one document identifies the 'what' (the risks), while the SWMS details the 'how' (the safe work procedure). This table breaks down the key differences to clarify its unique role.
| Aspect | Safe Work Method Statement (SWMS) | General Risk Assessment |
|---|---|---|
| Purpose | Provides step-by-step instructions for a specific high-risk task. | Identifies hazards and assesses risks across a workplace or entire project. |
| Scope | Narrow and task-specific (e.g., erecting scaffolding). | Broad and often covers multiple activities or an entire worksite. |
| Legal Status | Legally required for specific high-risk construction work in Australia. | A fundamental legal requirement for all businesses to manage WHS. |
| Focus | Procedural: Focuses on the 'how-to' of performing a job safely. | Analytical: Focuses on identifying and evaluating potential harm. |
| Audience | Primarily for workers and direct supervisors performing the task. | Primarily for management and safety officers to inform overall strategy. |
Getting this distinction right is crucial. While a risk assessment lays the groundwork, the safe work method statement is the practical tool that guides workers through hazardous tasks, ensuring safety is built into every single step.
Understanding Your Legal Obligations for a SWMS
Getting your head around the legal side of a Safe Work Method Statement can feel like wading through jargon, but it really boils down to a few key responsibilities. Under Australian law, a SWMS isn't just a helpful document for high-risk jobs—it's a legal must-have. This simple fact elevates it from a 'nice-to-have' piece of paper to a critical compliance tool that's there to prevent serious injury or death.
Who's Responsible? It Starts at the Top
The main responsibility lands squarely on the shoulders of the Person Conducting a Business or Undertaking (PCBU). This is a wide-ranging term that covers everyone from major employers and principal contractors right down to sole traders. If your business is in charge of the work, you're the PCBU, and the law says you must make sure a SWMS is in place before any high-risk construction work kicks off.
But it’s not a one-person job. The WHS Act is built on the idea of consultation. This means the PCBU can't just write the SWMS in an office and hand it down. They have to develop it with the very workers (and their health and safety reps) who will be doing the job. This collaboration is crucial because it ensures the safety steps are practical and actually make sense to the people on the tools.
What Is High-Risk Construction Work?
The law doesn't leave this to guesswork. A SWMS is mandatory for 18 specific activities that are legally classified as high-risk construction work (HRCW). These are the jobs where, if something goes wrong, it can go very wrong.
While the list is long, some of the most common HRCW activities you’ll encounter are:
- Any work where there's a risk of someone falling more than 2 metres.
- Work carried out on a telecommunication tower.
- Demolishing any part of a structure that is load-bearing.
- Working in or near a trench that’s deeper than 1.5 metres.
- Any work that takes place in a confined space.
- Jobs that involve using explosives.
- Working on or near pressurised gas mains or pipes.
- Working near chemical, fuel, or refrigerant lines.
- Any tasks on or near energised electrical services.
It's also important to remember that legal duties can be sector-specific. For example, those in agriculture must also follow essential farm safety guidelines to tailor safety planning to their unique work environment.
The Roles of Principal Contractors and Workers
On larger projects with multiple teams, the principal contractor has a vital oversight role. They are legally required to get a copy of the SWMS from every subcontractor doing high-risk work. More than that, they have to review those documents to make sure they're up to scratch before the work begins.
And what about the workers themselves? They have legal duties, too. Every worker must follow reasonable safety instructions and cooperate with the site's safety procedures. That absolutely includes following the control measures laid out in the SWMS for their specific task. Adhering to these Australian workplace safety standards is non-negotiable for keeping everyone on site safe.
The legal framework for a Safe Work Method Statement isn't just about ticking boxes. It's a system of shared responsibility designed to ensure that safety planning is collaborative, comprehensive, and actively implemented on site.
The Consequences of Getting It Wrong
Safety regulators do not take SWMS compliance lightly. Failing to have a proper SWMS for high-risk work can lead to inspectors shutting down your site on the spot. It’s common for inspectors to walk onto a site and quiz workers directly on the safety controls in their SWMS, just to see if they actually know what they’re supposed to be doing.
The penalties can be severe, ranging from heavy on-the-spot fines to major court-imposed penalties for the business and its leaders. These consequences make it crystal clear: your SWMS is a fundamental part of your legal and operational duties.
How to Create a Compliant SWMS Step by Step
Creating a safe work method statement that ticks all the boxes and actually keeps people safe can feel like a mountain of paperwork. But it doesn't have to be. If you break it down into a clear, logical process, a SWMS becomes less of a chore and more of a genuinely powerful safety tool.
Think of it as creating a practical blueprint for a high-risk job. This guide will walk you through building that blueprint, step by step.
The whole process relies on good communication and teamwork. A SWMS written by one person in an office is rarely worth the paper it's printed on. Its real strength comes from the combined knowledge of the people who actually do the work.
Step 1: Assemble Your Consultation Team
Before you even think about writing, you need to get the right people in the room. Under Australian WHS law, consultation isn't just a good idea—it's mandatory.
Your team absolutely must include the workers who will be performing the task, and their health and safety representative if they have one. Their hands-on experience is gold. They know what can go wrong and what control measures will actually work on the ground, not just in theory. Getting them involved from the get-go also builds a sense of ownership, making them far more likely to stick to the plan.
Step 2: Define the High-Risk Work
Next, you need to be crystal clear about what high-risk construction work (HRCW) the SWMS is for. Vague descriptions just won’t cut it. "Roof work," for example, is too broad.
Get specific. A much better description would be something like: "Installation of metal roofing sheets and flashing on a two-storey residential building at 123 Safety Street, using mobile scaffolding and fall arrest systems." This level of detail gives your document a clear focus and scope.
The diagram below shows the clear line of responsibility, from creating the SWMS to putting it into action, which is fundamental to the entire process.
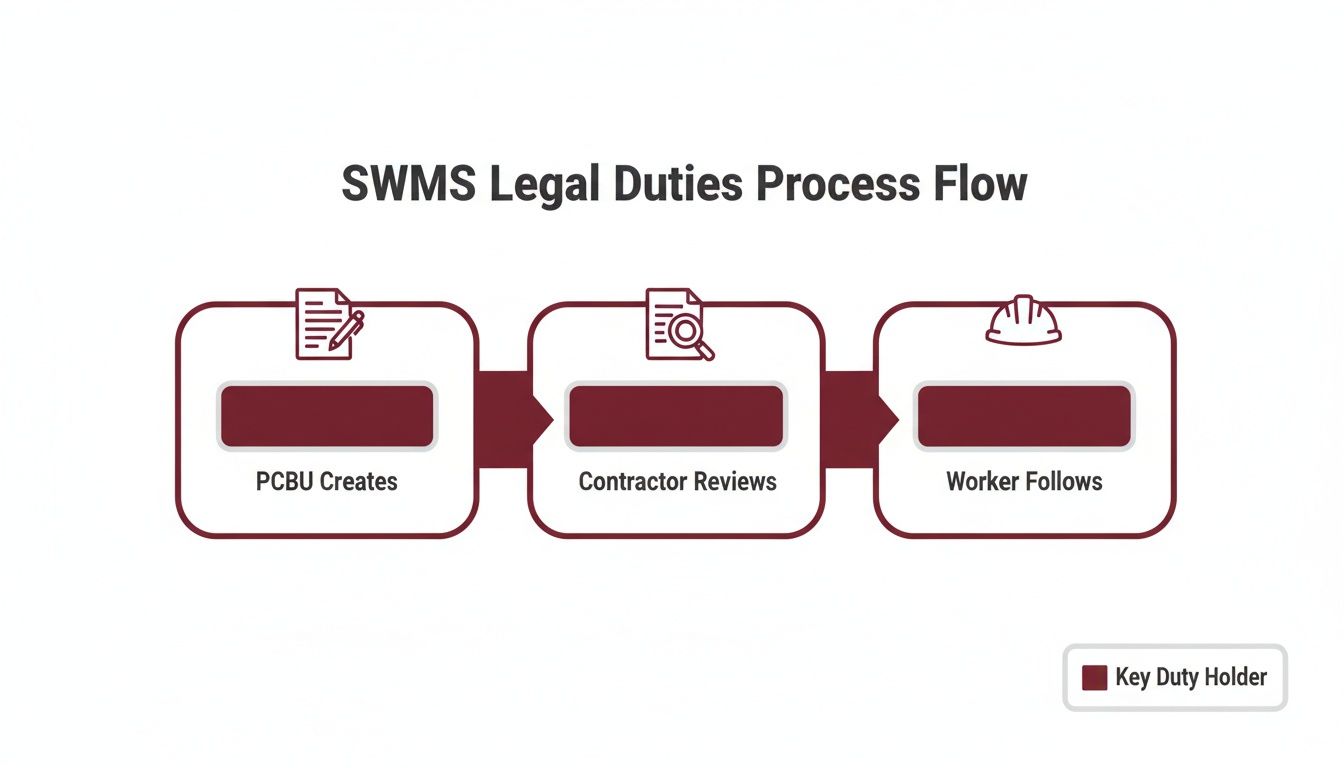
This flow highlights that the PCBU's duty to draft the document is only the beginning. It’s the active review and on-the-ground adherence that complete the safety cycle.
Step 3: Break the Job Into Sequential Steps
With the task clearly defined, you can now break it down into a sequence of steps, from start to finish. It’s a bit like writing a recipe—each step needs to be a distinct action.
Using our roofing example, the steps might look like this:
- Set up exclusion zones and put up warning signs at ground level.
- Erect the mobile scaffolding and carry out a pre-use inspection.
- Use a mechanical lift to load roofing materials onto the scaffold platform.
- Put on safety harnesses and connect to certified anchor points.
- Lay and secure each individual roofing sheet.
- Install ridge capping and flashing to weatherproof the roof.
- Clear all tools, offcuts, and waste from the roof area.
- Safely dismantle the mobile scaffolding.
Step 4: Identify Hazards for Each Step
Now, go through your list of steps, one by one, and brainstorm all the potential hazards. This is where your consultation with the work crew really pays off. They’ll often spot risks someone in an office might miss.
A hazard is anything that has the potential to cause harm. For every single step, you need to ask: "What could go wrong here that might hurt someone?"
Let's look at our roofing job again:
- Step 2 (Erect Scaffolding): Potential hazards could be the scaffold collapsing, components falling on people below, or manual handling injuries for the workers putting it up.
- Step 5 (Lay Roofing Sheets): Here, the obvious hazards are falling from a height, slipping on the roof surface, and getting deep cuts from the sharp metal edges.
Step 5: Determine and Implement Control Measures
For every single hazard you've identified, you need to decide on the control measures you’ll use to either eliminate the risk or, if that's not possible, minimise it. This isn't guesswork; it should be guided by the Hierarchy of Controls, which ranks safety measures from most effective to least effective. When dealing with complex equipment, this is very similar to conducting a detailed plant risk assessment to manage machine-specific dangers.
A great starting point is to use the Hierarchy of Control Measures, which forces you to consider the most effective options first.
The Hierarchy of Control Measures for Risk Management
| Control Level | Description | Example in Construction |
|---|---|---|
| Elimination | Physically remove the hazard completely. | Pre-fabricate wall frames on the ground to remove the need for working at height. |
| Substitution | Replace the hazard with a safer alternative. | Use a less toxic, water-based paint instead of a solvent-based one. |
| Isolation | Separate people from the hazard. | Install physical barriers and screens around a welding operation to protect others from sparks. |
| Engineering | Use engineering solutions to control the risk. | Fit guards on a circular saw or install an effective dust extraction system. |
| Administration | Change the way people work through procedures or training. | Implement mandatory exclusion zones, provide training, and display warning signs. |
| PPE | Protect the worker with Personal Protective Equipment. | Require hard hats, safety glasses, high-visibility clothing, and steel-capped boots. |
Remember, you should always aim for the highest level of control possible. PPE is always the last line of defence, used only when other, more effective controls are not practical.
Step 6: Finalise, Sign Off and Communicate
Once you've documented all the steps, hazards, and controls, it's time to finalise the SWMS. Everyone involved in the consultation process should review it to make sure it’s accurate, practical, and makes sense. When everyone is in agreement, the PCBU must sign and date the document.
The final, and arguably most important, step is communicating the SWMS to every worker involved in the job. This is usually done in a pre-start meeting or a toolbox talk. It’s your chance to ensure everyone understands exactly what they need to do to stay safe before the work even begins.
A copy of the signed SWMS must be kept on-site and be easy for workers to access at all times. After all, it’s their guide to a safe day’s work.
Anatomy of an Effective Safe Work Method Statement
A genuinely useful safe work method statement is more than just a box-ticking exercise for compliance. It needs to be a practical, easy-to-understand guide that anyone on site can pick up, read, and immediately know how to work safely. While templates are a good starting point, the best SWMS are always customised for the specific job at hand.
Let's break down what separates a document that just sits in a folder from one that actually keeps people safe on the ground.
Think of it as the blueprint for a safe operation. A builder wouldn't dream of starting without detailed architectural plans, and in the same way, no crew should tackle a high-risk job without a clear SWMS. Each section builds on the last, creating a complete picture of the task, its dangers, and the plan to get it done without incident.
Core Administrative Details
Before you even get to the nuts and bolts of the job, every SWMS needs to lay the groundwork with some basic administrative details. This section sets the scene, making sure the document is properly identified, tracked, and tied to the right project. Without this, a SWMS is just a generic piece of paper with no real context or authority.
At a minimum, you’ll need:
- Project Name and Address: Pinpoint the exact site where the work is happening.
- PCBU Information: The name, address, and contact details for the Person Conducting the Business or Undertaking.
- Principal Contractor Details: If there's a main contractor running the show, their details need to be here too.
- Document Control: This is crucial. Give it a unique SWMS number, a version number, and the date it was prepared. This simple step prevents confusion and ensures everyone is working off the latest, most current version.
Defining the Work and the Team
Okay, with the paperwork sorted, this next part gets into the specifics of the job itself. It clearly spells out the scope of the high-risk construction work (HRCW) and, just as importantly, identifies the people who had a hand in creating the plan and who will be responsible for carrying it out.
A solid SWMS will always document:
- Clear Description of Work: Be specific. Instead of "scaffolding work," write something like, "Erecting and dismantling perimeter scaffolding for a three-storey commercial building." The detail matters.
- Personnel Involved: You must list the names and positions of the workers who were consulted when the SWMS was developed. This isn't just good practice; it's a legal requirement that proves you’ve planned the work collaboratively.
- Required Licences and Qualifications: Note down any high-risk work licences, tickets, or specific skills needed for the job, like a scaffolding ticket or an EWP licence.
The Heart of the SWMS: The Risk Management Matrix
This is where the rubber hits the road. The risk matrix is the most critical part of the entire document, usually set up as a table that breaks the job down into sequential steps. For each step, it identifies the potential hazards and then details the specific control measures to manage them. This is where your safety plan truly comes to life.
Let's stick with our scaffolding example to see how this works in practice.
A well-structured risk matrix doesn't just list dangers; it connects each specific job step to its unique hazards and the precise safety controls required. This direct link makes the safety plan logical and easy for workers to follow.
Sample SWMS Matrix for Erecting Scaffolding
| Job Step | Potential Hazards | Control Measures | Person Responsible |
|---|---|---|---|
| 1. Establish Exclusion Zone | – Unauthorised site entry – Struck by falling objects |
– Erect barricades and warning signs around the work area. – Conduct a pre-start brief to inform all site personnel. |
Site Supervisor |
| 2. Unload Scaffolding Components | – Manual handling injuries (strains, sprains) – Struck by materials |
– Use mechanical aids (e.g., forklift) for heavy components. – Ensure clear communication between workers during unloading. |
Scaffold Team |
| 3. Assemble Scaffold Base | – Collapse of unstable structure – Slips, trips, and falls |
– Inspect ground conditions to ensure they are firm and level. – Use sole plates to distribute the load evenly. |
Scaffolders |
| 4. Erecting Scaffold to Height | – Fall from height – Dropped objects |
– Workers must wear harnesses attached to a suitable anchor point. – Install edge protection (handrails, toe boards) at each level. |
Scaffolders |
This step-by-step approach ensures that for every single action taken on the job, the associated risks have been thought through and a clear, practical control has been put in place. This clarity is what makes a safe work method statement truly effective.
Putting Your SWMS into Action on Site
A perfectly crafted safe work method statement is useless if it just gathers dust in a site office or sits unread in a vehicle's glove box. The real power of this document is unlocked when it’s actively used in the field. This is where you make the critical jump from planning safety on paper to implementing it on the ground, turning your SWMS into a dynamic, everyday tool for managing risk.
This process kicks off long before the first tool is picked up. Good implementation always starts with clear communication. It’s a legal requirement that everyone involved in the high-risk work is briefed on the SWMS, understands what’s in it, and has a chance to ask questions.
Making Sure Everyone is on the Same Page
The main way to get this communication done is through a pre-start meeting or toolbox talk. Don’t treat this as just a formality; it’s a vital session where supervisors walk the team through the document, step by step.
This discussion absolutely must cover:
- The specific steps of the job as laid out in the SWMS.
- The identified hazards at each stage of the work.
- The exact control measures that must be used to keep everyone safe.
- Who is responsible for putting each of those controls in place.
On top of that, the document must be easy to get to. This means having a copy physically present right where the work is happening, not locked away in an office. When putting your SWMS into action, ensuring tasks are performed safely is critical, especially during complex jobs like safely installing metal buildings. Keeping the SWMS on hand lets workers refer back to it anytime, reinforcing the safety procedures everyone agreed on.
A SWMS is a Living Document, Not a Static Form
A common mistake is treating a SWMS as a "set and forget" document. The reality is, worksites are constantly changing environments where conditions can shift in an instant. To stay effective and compliant, your SWMS must be a living document that evolves with the project.
A SWMS is only valid as long as it accurately reflects the work being done. If the situation on the ground changes, the document must be reviewed and updated immediately to match.
This ongoing monitoring and review process isn't just good practice—it's a legal requirement. A SWMS must be reviewed, and if necessary, revised, if a control measure isn't working or if the scope of work changes.
Triggers for an Immediate SWMS Review
Certain events should automatically trigger a review to ensure the safe work method statement is still relevant. You must stop work and review your SWMS if:
- An incident or near-miss occurs. This is a massive red flag that your existing controls might be inadequate or weren't being followed.
- Site conditions change. This could be anything from a sudden change in weather, new equipment arriving on site, or other work crews moving into the area.
- The work activity itself is altered. If the team needs to do something differently than what was originally planned, the SWMS has to be updated before they proceed.
- A consultation indicates a need for review. If a worker or health and safety representative raises a valid concern, it has to be addressed through a proper review.
By building a culture where the SWMS is seen as an active, on-site guide, you empower your team to manage risks proactively. This transforms it from a piece of compliance paperwork into a practical tool that sits at the very centre of the daily safety conversation on site.
Got Questions About Your SWMS? Let's Clear Things Up.
Even when you know the theory behind a safe work method statement, putting it into practice on a busy site can bring up a lot of questions. Since these documents are a cornerstone of Australian workplace safety, getting the details right is non-negotiable—both for compliance and, more importantly, for keeping your people safe.
Let's tackle some of the most common questions that pop up when dealing with high-risk construction work.
What’s the Difference Between a SWMS and a JSA?
This is easily the most frequent point of confusion, and it’s a crucial one to get right. While a SWMS and a Job Safety Analysis (JSA) are both designed to make work safer, they serve different purposes and have very different legal weight in Australia.
Think of a JSA as your initial, broad-strokes risk assessment tool. It’s a fantastic way to break down almost any job into smaller steps and spot potential hazards. A JSA is informal and flexible; you can use it for anything from routine workshop maintenance to low-risk tasks on site.
A safe work method statement, on the other hand, is the official, legally required document for the 18 specific high-risk construction work (HRCW) activities. It goes far beyond just spotting hazards. A SWMS is a detailed, legally binding plan that spells out exactly how those risks will be controlled, who is responsible, and how the controls will be monitored.
To put it simply:
- A JSA helps you find and understand the risks for just about any task.
- A SWMS is the legal plan to control the risks for a specific high-risk construction job.
Who’s Actually Responsible for Preparing the SWMS?
Ultimately, the buck stops with the Person Conducting a Business or Undertaking (PCBU). This is the company or individual whose workers are carrying out the high-risk job. So, whether you're a principal contractor, a subcontractor, or a sole trader, if they're your workers, it's your responsibility.
But—and this is a big but—creating a SWMS is never a one-person job done from an office. The WHS Act is crystal clear: the PCBU must develop the SWMS in consultation with the workers doing the job and their health and safety representatives. This isn't just a suggestion; it's a legal requirement. This collaborative approach makes sure the final document is practical and actually makes sense to the people on the tools.
On larger sites, the principal contractor also has a duty to gather all the SWMS from their subcontractors, review them thoroughly, and make sure they’re up to scratch before any high-risk work kicks off.
The responsibility for a SWMS is shared. While the PCBU is accountable for its creation, the process must involve the workers who will use it, and the principal contractor must ensure its compliance before work starts.
How Often Do I Need to Review a SWMS?
A SWMS isn't a "set and forget" document. It’s a living tool that has to reflect what’s actually happening on the ground, right now.
A review is mandatory before the high-risk work begins to ensure nothing has changed. After that, you must review and, if needed, revise it whenever:
- An incident or a near-miss happens.
- The job changes, the site conditions alter, or a new piece of equipment is brought in.
- You realise a control measure isn't working as well as it should.
- A new, previously unspotted hazard emerges.
- A health and safety representative requests a review.
Regular check-ins keep the SWMS relevant and effective, turning it from a piece of paper into a genuine safety asset for the entire project.
Can I Just Use a Generic SWMS Template?
Using a template is a great starting point. It gives you a solid structure and helps ensure you don't miss any of the essential components. However, you absolutely cannot just download a generic SWMS, fill in the blanks, and call it a day. That’s a one-way ticket to a compliance breach.
A compliant safe work method statement must be site-specific and task-specific. When a safety regulator looks at your SWMS, they need to see that you’ve thought about the unique conditions of your site—the ground conditions, the other trades working nearby, the specific equipment being used, and the people involved.
A generic template that hasn't been carefully customised for your specific project, through consultation with your crew, simply won't cut it. Think of a template as the blueprint, but the final document has to be a detailed, custom-built plan for your unique work. That customisation is what gives it real power.
At Anitech, our expert occupational hygienists provide the scientific knowledge and practical support needed to effectively identify, assess, and control workplace hazards. We assist businesses in developing robust safety management systems, ensuring your control measures are not just compliant but truly effective in protecting your workforce. Contact us today to learn how we can help you build a safer, healthier workplace.


