
Quick Summary: This master blueprint provides a comprehensive guide to modern property diagnostic meth testing. It covers every essential stage, from initial risk assessment and selecting the correct screening methods to interpreting lab results and verifying decontamination. This guide is your central resource for all screening and verification methods, ensuring property safety, legal compliance, and asset protection.
Here’s your all-in-one guide to navigating the world of property meth testing. We’ve put together a complete blueprint that cuts through the complexity, giving you a clear path for identifying, assessing, and dealing with methamphetamine contamination in Australian properties.
From initial risk checks and accurate testing to making sense of the results and getting the all-clear after a clean-up, this is the practical advice you need. This comprehensive hub for all screening and verification methods will serve as your definitive resource.
The Definitive Blueprint for Property Meth Testing
When you’re faced with potential meth contamination, a simple test kit just isn’t enough. You need a structured, strategic plan to get it right. This guide is your central resource for every screening and verification method out there, designed to protect your property’s value, keep occupants safe, and make sure you’re ticking all the legal boxes.
Think of this process like a builder’s blueprint. You wouldn’t start building a house without a detailed set of plans, and you shouldn’t try to manage contamination risks without a clear, step-by-step process. We’ll walk you through every critical stage, from the first hint of a problem right through to the final clearance certificate.
Here’s what we’ll cover:
- Why systematic meth testing is more important than ever.
- How to build a practical risk assessment framework you can actually use.
- The different diagnostic tools and how to choose the right one for your situation.
- Making sense of lab results and what they mean for remediation.
- The final steps to verify a property is officially decontaminated and safe.
Understanding the Modern Meth Contamination Landscape
Before we get into the nuts and bolts of testing, it’s crucial to grasp why a proper blueprint for meth testing isn’t just a ‘nice to have’ anymore—it’s essential. Meth contamination is a silent threat. It invisibly seeps into properties, wrecking their value and creating serious health risks for anyone inside, long after the drug activity has stopped.
Think of it like a hidden water leak. You can’t see the first few drips behind the wall, but over time, that moisture spreads, leading to mould, rot, and major structural damage. By the time you spot a stain on the paint, you’ve got a massive, expensive problem on your hands. Meth residue works the same way; it clings to surfaces, unseen but deeply embedded.
And this isn’t just a problem for houses and apartments. We’re seeing a growing risk in commercial and industrial sites, where the legal duty of care to keep people safe is non-negotiable. Don’t assume industries like mining, manufacturing, or logistics are immune. In fact, places with transient workers or large, remote facilities can be especially vulnerable.
The Data Behind the Risk
The latest numbers really paint a stark picture for Australian businesses. Workplace drug screening results often give us a good sense of what’s happening in the wider community, and right now, they’re flagging a significant rise in methamphetamine use—and with it, a higher risk of property contamination.
Data from the third quarter of 2025 showed that meth was the number one drug detected in Australian workplace tests, turning up in a shocking 53.2% of all positive results. That figure is a big jump from the previous quarter and a major red flag for any industry where occupational hygiene matters. You can explore more key workplace drug trends to see the full picture.
This isn’t just about cleaning up a mess you already know about. It’s about building a proactive system to manage risk. A solid blueprint is the only way for property owners to meet their duty of care, shield their assets, and avoid serious liability.
A Systematic Approach to an Invisible Problem
Simply hoping your property isn’t contaminated is a high-stakes gamble. The fallout can be immense: legal liability for health problems, a nosedive in your asset’s value, and significant business disruption. Following a clear, systematic blueprint shifts you from being reactive and vulnerable to being in control.
A structured framework like this lets you:
- Spot potential risks before they blow up into huge remediation bills.
- Protect your staff, tenants, and visitors from the dangerous health effects of third-hand exposure.
- Safeguard the financial and reputational value of your entire property portfolio.
- Stay on the right side of the law by proving you’ve done your due diligence.
At the end of the day, having a master plan for meth testing is a core part of modern property and asset management. It gives you the clarity and confidence you need to handle this complex problem effectively.
Building Your Strategic Risk Assessment Framework
Before you even think about picking up any testing gear, the first real step in any meth diagnostic plan is a smart risk assessment. Think of it like a doctor’s first chat with a patient. They don’t send you for an MRI straight away; they ask questions, listen, and look for the obvious signs first. In the same way, this initial evaluation helps you spot the red flags so you can focus your efforts where they’ll count the most.
This isn’t about guesswork. It’s a practical way to sort properties into different risk categories. You’ll avoid wasting money testing low-risk homes while making absolutely sure that high-risk properties get the immediate, thorough attention they need. It’s the foundation for a targeted strategy that saves you both time and headaches down the track.
Identifying Key Risk Indicators
Your assessment begins with a bit of old-fashioned detective work. You’re looking for clues across three main areas: the property’s history, the behaviour of who’s living there, and the physical state of the place itself. Each piece of information helps you build a clearer picture of the potential risk.
- Property History: Dig into the property’s past. Has it been a rental with a revolving door of tenants? Are there any police records tied to the address or whispers from neighbours about suspicious goings-on? A history of short-term occupants or known links to illegal activity instantly bumps a property into a higher risk category.
- Tenant and Occupant Behaviour: You learn a lot by observing. Tenants who are unusually secretive, strange chemical smells that come and go, blacked-out windows, or a constant stream of visitors at odd hours are all classic warning signs. For a commercial site, this might be unexplained chemical odours or odd waste disposal habits.
- Physical Signs and Clues: Keep your eyes peeled for small but telling details. Yellow, brown, or red stains on walls, floors, or ceilings can be a dead giveaway for chemical spills. If you spot weird-looking plumbing modifications, extra ventilation systems, or a stockpile of empty chemical containers, those are major red flags that demand a closer look.
Categorising Property Risk Levels
Once you’ve gathered your intel, it’s time to classify the property. A simple categorisation system makes your response consistent and gives you a clear justification for any action you take. Juggling all this can be tricky, but good property management is made easier with the right tools; it’s worth checking out some of the best property management apps to help keep everything organised.
A structured risk assessment isn’t about making assumptions; it’s about making informed decisions based on evidence. This methodical approach transforms your meth testing from a random guess into a calculated, cost-effective strategy.
Here’s a straightforward framework you can use:
- Low Risk: These are properties with long-term, trusted tenants and no suspicious history or physical signs. A routine check between tenancies is likely all you need here.
- Medium Risk: Here you have a few things that don’t quite add up, like high tenant turnover or unconfirmed reports from neighbours, but no hard physical evidence. These places warrant closer monitoring and maybe a baseline screening test.
- High Risk: These are the properties with multiple, solid red flags. We’re talking confirmed police reports, strong chemical smells, visible staining, or finding drug-related paraphernalia on-site. These properties need to be at the top of your list for immediate, comprehensive testing by a qualified occupational hygienist.
This structured assessment is the bedrock of a smart, defensible meth management plan. It ensures your response is proportional to the actual risk, protecting people and your property without breaking the bank.
Choosing the Right Diagnostic Testing Methods
Once you’ve sized up the risk at a property, the next step in our master blueprint for modern property diagnostic meth testing is picking the right tool for the job. This is where we get into the science of actually finding the contamination. Think of it like a detective’s toolkit—you wouldn’t use a magnifying glass to analyse DNA, and the same principle applies here. You need different instruments for different situations.
Knowing which test to use, and when, is the key to an effective and cost-efficient strategy.
Screening Kits: Your First Line of Defence
Instant-result screening kits are your go-to for a quick first look. They’re often called presumptive tests because they give you a simple ‘yes’ or ‘no’ answer, showing whether methamphetamine residue is present on a surface. They’re fast, affordable, and easy enough for property managers to use during an initial walk-through.
But their simplicity is also their biggest weakness. A positive result confirms meth is there, but it cannot tell you how much. This is a crucial difference because Australian remediation guidelines are all about specific contamination levels, not just whether a trace exists.
A positive screening result should be seen as a trigger for the next step, not the final word. It gives you the justification to bring in the professionals for quantitative lab analysis without overspending on properties that are actually clean.
Laboratory Analysis: The Gold Standard for Accuracy
When you need precise, legally-defensible data, accredited laboratory analysis is the only way to go. This involves a trained technician or occupational hygienist taking physical samples from the property. These are then sent to a lab for detailed analysis using highly sensitive equipment, like liquid chromatography-mass spectrometry (LC-MS).
This method gives you quantitative results, measuring the exact concentration of meth residue, usually in micrograms per 100 square centimetres (µg/100cm²). This is the hard data you need to compare against the national guidelines and determine if remediation is legally required. It costs more and takes longer than a screening kit, but for high-risk properties or post-remediation clearance, the accuracy is non-negotiable.
This simple flowchart can help you decide which path to take based on your initial gut feeling and observations.
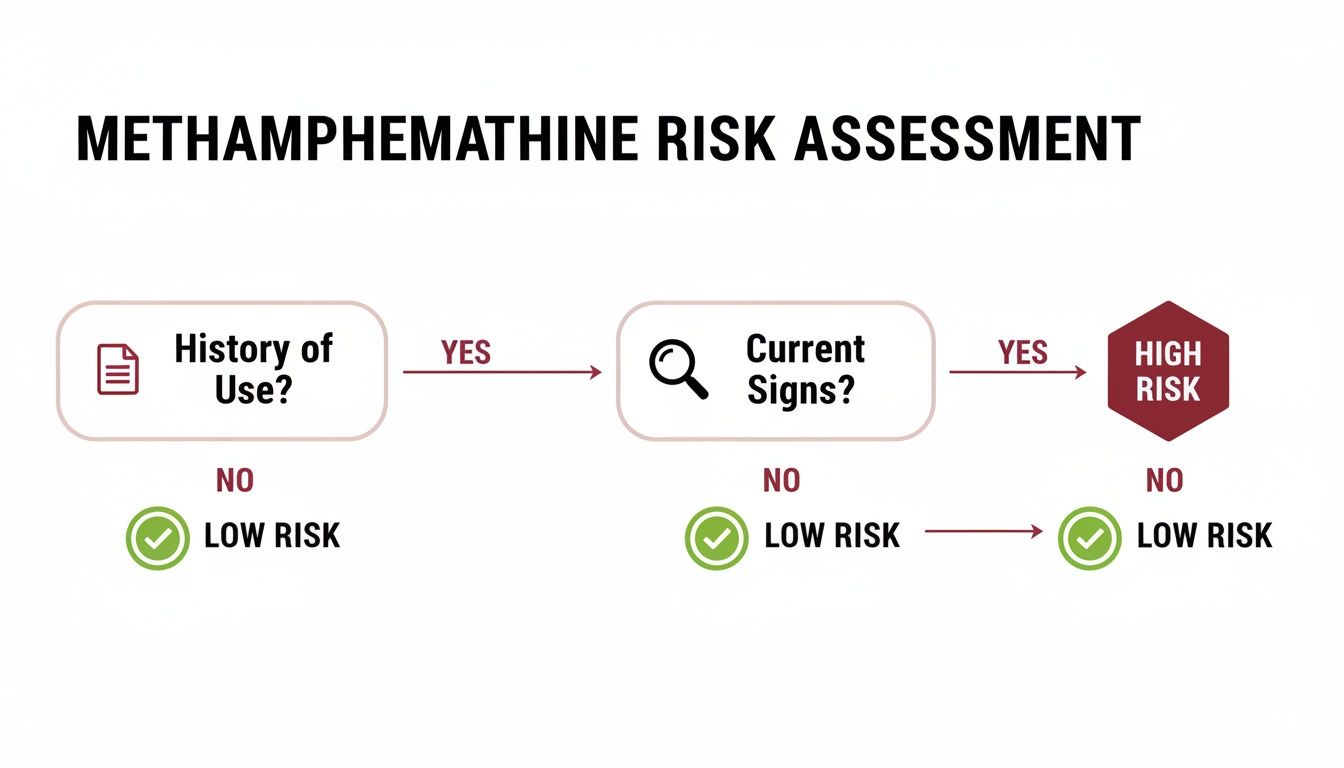
The takeaway here is that what you see and learn upfront directly shapes your technical approach. This stops you from wasting money on detailed testing for low-risk sites and ensures high-risk ones get the serious analysis they demand.
Selecting the Appropriate Method for Your Scenario
To make this clearer, let’s walk through a couple of common scenarios you might face.
- Scenario 1: The Former Rental Property. A long-term tenant just moved out. Your risk assessment has flagged the property as low-to-medium risk. Maybe there were some unconfirmed complaints from neighbours, but there are no obvious physical signs of drug activity. Here, starting with a few strategically placed screening kits is a smart, budget-friendly move. A negative result gives you peace of mind. A positive hit gives you the evidence to justify professional lab testing.
- Scenario 2: The Suspected Clandestine Lab. Police have raided a property you manage and found evidence of drug manufacturing. The site is automatically high-risk. In this case, you would bypass screening kits entirely. The question is no longer if meth is present, but how bad the contamination is. The only logical step is to call in a certified occupational hygienist to conduct a full site assessment and collect samples for lab analysis to map out the full extent of the problem.
Choosing the right test is critical, and the table below breaks down the options to help you make an informed decision.
Comparison of Meth Testing Methods
| Testing Method | Best For | Accuracy | Cost | Key Limitation |
|---|---|---|---|---|
| Instant Screening Kits | Initial, low-risk assessments; quick yes/no checks for property managers. | Qualitative (Presence/Absence) | Low | Cannot measure contamination levels; prone to false positives. |
| Composite Lab Testing | Cost-effective screening of multiple areas in a low-to-medium risk property. | Quantitative (Average Level) | Medium | Averages out high and low spots; can’t pinpoint specific hotspots. |
| Discrete Lab Testing | High-risk properties, post-remediation clearance, and pinpointing contamination hotspots. | Quantitative (Specific Level) | High | Most expensive method due to individual sample analysis. |
Ultimately, matching the testing method to the risk level is what creates an efficient, defensible, and scientifically sound diagnostic process.
While our focus here is on meth, a solid understanding of general building diagnostics provides a wider perspective, reinforcing the importance of using targeted, evidence-based methods for any potential contaminant.
The sheer scale of meth use in Australia makes this diligence essential. Methamphetamine dominates the nation’s illicit drug market, accounting for roughly 85% of its $10.5 billion market value. This widespread use, especially high in regional South Australia and Western Australia, directly elevates the risk for properties everywhere, from city apartments to remote industrial sites. Matching your testing method to the risk isn’t just good practice—it’s a necessary defence.
Interpreting Your Lab Results and Kick-starting Remediation
Getting a lab report back can feel a bit like reading a foreign language. It’s a page full of technical jargon and numbers, but this is the moment where data has to become a decision. The real skill is turning that scientific information into a straightforward, actionable plan.
Those numbers on the page aren’t just abstract figures. They represent the actual concentration of methamphetamine residue on surfaces, measured in micrograms per 100 square centimetres (µg/100cm²). Think of it as the standard yardstick for figuring out if a property is safe or if it’s time to call in the professionals.
The Numbers That Really Matter
When you scan that report, there’s one key number you’re looking for. It’s the threshold set by the Australian Government’s Clandestine Drug Laboratory Remediation Guidelines, which is the national benchmark for safety and compliance.
For almost all residential and commercial properties, the trigger point is 0.5 µg/100cm². If any of your individual samples come back higher than this, it legally mandates professional decontamination.
It’s really important to understand the difference between a simple positive reading and contamination that actually breaches this legal limit. For instance, an initial screen might pick up a tiny trace, maybe 0.1 µg/100cm². This points to past drug use but doesn’t necessarily mean you need a full-scale, expensive clean-up. On the other hand, a result of 2.5 µg/100cm² is a whole different story—it flags a serious health risk and means you absolutely have to take action.
Below is a quick reference table showing how different contamination levels trigger specific actions based on Australian guidelines.
Australian Remediation Guideline Thresholds
| Contamination Level (µg/100cm²) | Guideline Source | Required Action | Applies To |
|---|---|---|---|
| > 0.5 | Australian Clandestine Drug Laboratory Remediation Guidelines | Mandatory professional decontamination and validation. | Most residential & commercial properties. |
| > 5.0 | Australian Clandestine Drug Laboratory Remediation Guidelines | Specialist assessment for heavy contamination. | Areas with evidence of meth manufacturing. |
| Any Detectable Level | Specific state tenancy laws or insurance policies | May require disclosure or cleaning to a lower limit. | Rental properties, insurance claims. |
This table simplifies the decision-making process, linking the lab results directly to the necessary next steps.
Your Step-by-Step Guide: From Report to Remediation
Once you’ve confirmed contamination above that critical 0.5 µg/100cm² guideline, your focus has to shift immediately from investigation to action. A fast, organised response is crucial for protecting anyone who enters the property, securing the site, and starting the journey back to a clean bill of health.
Here’s a clear, methodical process to guide you:
- Secure the Property Immediately: As soon as you have that confirmed lab result, the property needs to be vacated. No exceptions. Post clear warning signs and restrict all access to prevent anyone else from being exposed to the hazardous residues.
- Engage a Certified Occupational Hygienist: Your first phone call should be to an independent occupational hygienist. It’s vital that this expert is separate from any cleaning company. They will conduct a detailed site assessment, map out the extent of the problem, and create a formal Remediation Action Plan (RAP).
- Appoint a Specialist Decontamination Contractor: The RAP is your roadmap; it will detail the exact cleaning methods needed. Your next step is to hire a specialised company with a proven track record in meth decontamination to carry out this plan precisely as the hygienist has specified.
- Execute the Remediation Action Plan: The contractors get to work. This could involve anything from specialised chemical washing of all surfaces to the complete removal and disposal of porous materials like carpets, plasterboard, and furniture.
- Conduct Post-Remediation Verification: After the cleaning crew has finished, the occupational hygienist comes back. They perform independent clearance testing to verify the job was done right. This final check is non-negotiable—it’s the official proof that the property is safe again and meets the national guidelines.
Following a structured response like this is fundamental. The sad reality is that the growing prevalence of methamphetamine has made these services more critical than ever. To put it in perspective, Australia’s market for drug-of-abuse testing services hit USD 76.0 million and is expected to reach USD 106.5 million by 2030, largely driven by this issue. With border seizures skyrocketing from 71 kg in 1997 to a staggering 5.2 tonnes in 2020, the need for a systematic response plan is crystal clear. Discover more insights about Australia’s drug testing market.
By sticking to this methodical approach, you make sure every action is documented, compliant, and ultimately effective. It turns a daunting lab report into a manageable process that not only restores safety but also protects the value of your asset.
Verifying and Clearing a Remediated Property
So, the decontamination specialists have packed up their gear and driven away. But don’t pop the champagne just yet—the job isn’t quite finished. Now comes what is arguably the most critical chapter in the whole process: the verification. This isn’t just a box-ticking exercise; it’s the official, science-backed confirmation that the property is genuinely safe for people to live or work in again.
Think of it like getting the final sign-off from a building certifier after a major renovation. The chippies and plumbers might tell you everything is up to code, but it’s the independent certifier’s approval that makes it official and guarantees the work meets Australian Standards. Post-remediation testing does the exact same job, but for invisible chemical hazards.
Skipping this final step is a huge gamble. It’s non-negotiable for legal compliance, satisfying your insurance company, and fully restoring the property’s value. Without it, you’re essentially operating on blind faith, leaving yourself wide open to massive liability down the track.
The Role of Independent Verification
For this final check to have any real credibility, it has to be completely independent. This means the occupational hygienist who conducts the clearance testing must be a neutral third party, entirely separate from the company that did the cleaning. This is a critical distinction that removes any potential conflict of interest.
Let’s be honest, the cleaning company has a vested interest in the property passing. An independent hygienist, on the other hand, has only one goal: to give you an unbiased, factual assessment of the property’s safety based on hard data. Their loyalty is to the scientific standard, not to a particular outcome.
An independent verification is the bedrock of a legally defensible remediation process. It offers objective proof that the property has been returned to a safe state, meeting or falling below the national guideline of 0.5 µg/100cm².
Developing the Clearance Sampling Plan
A good hygienist won’t just re-test the same spots they swabbed the first time around. Instead, they’ll develop a new, targeted sampling plan designed specifically for clearance. This strategy focuses on the areas that were previously the most contaminated, plus other surfaces that are notoriously difficult to clean properly.
This strategic approach will almost always involve:
- Re-testing former hotspots to confirm the decontamination worked where it was needed most.
- Sampling high-contact surfaces like benchtops, door handles, and light switches, as these pose the biggest risk for human exposure.
- Assessing porous materials like unsealed timber or concrete if they weren’t removed, to ensure no residue is leaching out.
The aim is to get a truly representative picture of the entire property. It’s about proving that the remediation wasn’t just a surface-level clean, but a thorough and comprehensive one. Each sample is carefully collected, documented, and sent off to an accredited lab for analysis, following the same strict protocols as the initial investigation.
The Final Clearance Certificate
Once the lab results come back and every single sample shows meth levels are safely below the Australian guideline, the occupational hygienist can finally issue a Clearance Certificate (sometimes called a Validation Report).
This document is your golden ticket. It’s the official record that declares the property safe and fit for reoccupation. It gives you:
- Legal Protection: It’s documented proof that you’ve met your duty of care and complied with all relevant health and safety regulations.
- Insurance Validation: Your insurer will almost certainly demand this certificate before they’ll settle a claim or reinstate your policy.
- Restored Property Value: A clearance certificate effectively removes the stigma of meth contamination, allowing you to sell, lease, or occupy the property with complete confidence.
Without this final piece of paper, the whole remediation process is left hanging. The property’s status remains in limbo, and your liability is still on the table. It is the conclusive step that closes the loop, transforming a hazardous site back into a safe, valuable asset.
Got Questions About Meth Testing? We’ve Got Answers
When it comes to meth testing a property, it’s natural to have a lot of questions. Getting your head around the details can feel overwhelming, but it doesn’t have to be. Here are some straightforward answers to the most common queries we hear from property owners and managers.
How Often Should a Property Be Tested?
There’s no single right answer here—it really boils down to your property’s unique risk profile. A smart, risk-based approach helps you stay protected without overspending.
If you’re managing a high-risk property—think places with a high turnover of short-term tenants, a history of strange behaviour, or located in an area with known drug problems—testing between every tenancy is a wise move. It’s a proactive strategy that gives you a continuous, documented record of the property’s condition.
On the other hand, for a low-risk commercial property with a stable, long-term tenant and no red flags, testing when the lease turns over is usually enough. Of course, if you ever notice suspicious signs during a tenancy, like strange chemical smells or odd behaviour, it’s time to test. The goal is to make meth testing a standard part of your health and safety checklist, not just something you do when a crisis hits.
Are Those DIY Meth Test Kits Any Good?
DIY kits definitely have their place. Think of them as a first-line screening tool. They’re great for getting a quick, cost-effective ‘yes’ or ‘no’ answer on whether meth residue is present.
But it’s crucial to understand their limitations. These kits are qualitative, not quantitative. They can tell you if meth is there, but they can’t tell you how much. This is a big deal, because the Australian guidelines for cleaning up a property are all based on specific contamination levels (like the 0.5 µg/100cm² threshold).
A positive result from a DIY kit isn’t the end of the story; it’s the starting pistol. It’s your cue to bring in a professional occupational hygienist for proper laboratory analysis. That’s the only way to get the hard numbers you need to make compliant, safe decisions.
How Serious Are the Health Risks From Low-Level Contamination?
It’s a dangerous myth that only high levels of meth residue are harmful. The truth is, even invisible, low-level contamination can cause real health problems for anyone living or working in the space. People can be exposed by touching contaminated surfaces, breathing in off-gassing chemicals, or accidentally ingesting tiny particles.
Over time, this constant exposure can lead to a whole host of nagging health issues. We often see people report:
- Breathing problems: A cough that won’t go away, shortness of breath, or asthma-like symptoms.
- Neurological issues: Headaches, feeling dizzy or confused, and trouble sleeping.
- Skin and eye irritation: Unexplained rashes, sores, or burning, watery eyes.
- Mood and behaviour changes: Feeling unusually irritable, anxious, or finding it hard to concentrate.
In a workplace, these symptoms aren’t just a personal health problem—they’re a serious occupational hygiene risk. If your team can’t concentrate or their coordination is off, the chance of accidents and injuries skyrockets, especially in workshops or factories.
Is Professional Meth Decontamination Really Expensive?
The cost of a professional clean-up can vary quite a bit. The final bill depends on things like the size of the contaminated area, how high the contamination levels are, and what kinds of materials are affected—cleaning hard surfaces like glass is a lot different from dealing with porous materials like carpet or plasterboard.
Yes, it can be a significant upfront cost. But you have to see it as an essential investment in protecting people, your property, and your legal standing. The costs of not cleaning up a contaminated property are almost always much, much higher. You could be facing ongoing health issues for tenants or staff, massive legal liability, a huge drop in your property’s value, and even fines for breaching health and safety laws. A professional decontamination is the only way to properly manage these long-term risks.
We provide the expert occupational hygiene services you need to work through every step of this process, from the first assessment to the final clearance certificate. Our scientific approach ensures your property is safe, compliant, and protected.
Contact our team today to implement your property diagnostic plan.
📚 More in This Series: Testing Methods & Process
- How Does Meth Testing Work? Complete Step-by-Step Guide
- Meth Clearance Testing & the 0.5 µg/100cm² Standard
- How to Do a Methamphetamine Site Assessment | Full Guide
- Meth Lab Tests vs Swab Kits: Accuracy & Reliability
- Understanding PPM in Meth Lab Reports: Read Your Results
- Forensic Swabbing vs Field Testing for Meth: Accuracy
- Thermal Imaging for Meth Contamination Detection | Case Study


