
Learning how to fix hand arm vibration is about understanding it's a serious—and seriously overlooked—hazard in many workplaces. Dealing with it isn't a quick fix; it's a methodical process involving vibration risk assessment and control. It all starts with pinpointing where the vibration is coming from, getting your head around the key exposure numbers, and seeing the risks before the damage is done. This approach is the first and most critical step to keeping your people safe from hand arm vibration syndrome (HAVS).
Getting to Grips with Hand-Arm Vibration on Your Site
Hand-Arm Vibration, or HAV as it's often called, is exactly what it sounds like. It’s the vibration that travels into your hands and arms from using power tools or even just holding a workpiece that's being machined.
A little bit of vibration here and there might not seem like a big deal, but when your team is exposed to it day in and day out, it can lead to a nasty, permanent condition: Hand-Arm Vibration Syndrome (HAVS).
And let's be clear, this isn't just a bit of tingling. HAVS is a collection of debilitating conditions affecting the nerves, blood vessels, muscles, and joints. The worst part? The damage is irreversible. Once it’s done, it’s done. This makes prevention the only game in town. For any safety manager, business owner, or operator in a high-risk industry, understanding these basics is non-negotiable.
The Numbers That Matter
If you're going to manage HAV, you need to speak the language. The single most important figure you'll come across is the daily vibration exposure, which is written as A(8). This isn't just a measure of how hard a tool shakes. It's a combination of that vibration level and the total time a worker is exposed to it over a typical eight-hour day.
Here in Australia, two specific thresholds dictate your actions:
- Exposure Action Value (EAV): Set at 2.5 m/s² A(8). Think of this as your first warning bell. When an employee hits this level, you’re required to take action to reduce their exposure.
- Exposure Limit Value (ELV): This is the hard line, set at 5.0 m/s² A(8). Under no circumstances should a worker's exposure ever go over this limit.
It’s a common mistake to think that only the most powerful tools are a problem. Even equipment with relatively low vibration can easily tip someone over these limits if they’re using it for hours on end. That’s why just buying a "low-vibration" tool isn't a silver bullet—you have to factor in how long it's actually in someone's hands.
How Big is the Problem in Australia?
The reality is, far more workers are at risk than most people think. A major national survey found that an estimated 3.8% of the Australian workforce were exposed to vibration above the 2.5 m/s² action value on their last workday. Digging deeper, about 0.8% were found to be over the hard limit of 5.0 m/s², putting them in a very high-risk category.
These aren't just abstract statistics; they represent thousands of workers whose long-term health is on the line. This is a widespread issue that demands proactive management. If you want to dive into the data yourself, you can read the full findings in the Australian Workplace Exposure Survey.
The single most important thing to remember is this: HAVS is 100% preventable, but it is completely incurable. That fact alone makes early identification and control an absolute essential, not just a 'nice to have'.
Pinpointing the culprits: Where is the Vibration Coming From?
The first practical step is to walk your site and identify the sources. It's easy to spot the obvious ones, like jackhammers and concrete breakers, but vibration is lurking in a huge range of everyday tools across dozens of industries. From fabrication workshops and auto repair garages to construction sites and council parks, the risk is everywhere.
To help you get started, I've put together a table that breaks down some of the most common high-vibration tools you'll find in key Australian industries.
Common Sources of Hand Arm Vibration Across Industries
This table will help you quickly pinpoint the high-risk tools and equipment that might be putting your team at risk in your own work environment.
| Industry | Common High-Vibration Tools & Equipment | Typical Tasks |
|---|---|---|
| Construction & Demolition | Jackhammers, concrete breakers, rock drills, compactors | Breaking concrete, roadworks, drilling, soil compaction |
| Manufacturing | Grinders, sanders, pneumatic wrenches, riveters, polishers | Metal finishing, assembly, fabrication, deburring |
| Vehicle Repair & Maintenance | Impact wrenches, orbital sanders, air chisels, grinders | Tyre changing, bodywork, exhaust fitting, rust removal |
| Landscaping & Groundskeeping | Chainsaws, hedge trimmers, leaf blowers, lawn mowers | Tree felling, hedge cutting, clearing debris, lawn maintenance |
| Mining & Quarrying | Rock drills, scaling hammers, vibratory screens | Drilling blast holes, removing loose rock, material processing |
Use this table as a starting point for your own workplace audit. Walk the floor, talk to your operators, and build a clear picture of where your team's exposure is coming from. This identification process is the foundation for everything that follows.
How to Conduct a Practical Vibration Risk Assessment
To get a real handle on hand-arm vibration, you first have to understand the scale of the problem in your own workplace. Guesswork just won't cut it. A proper vibration risk assessment is the crucial first step that shifts your safety approach from reactive to proactive, giving you the hard data needed to genuinely protect your team.
The goal here isn't just about ticking a box. It's about building an accurate, real-world picture of who is exposed, what tools they're using, and for how long. The process starts with simple, yet vital, observations and can scale up to more detailed evaluations when needed.
This flowchart lays out the straightforward, three-stage process: identify the hazard, measure the risk, and then take informed action.
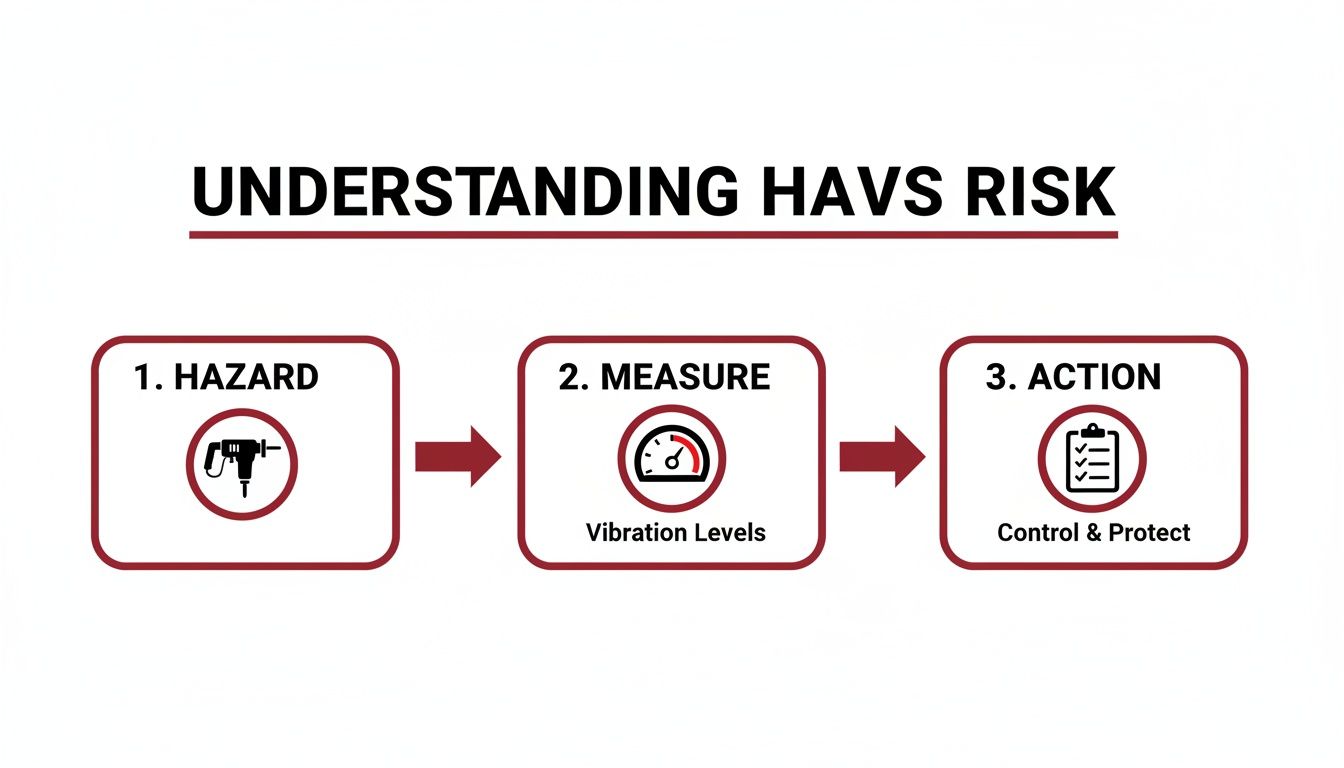
As you can see, effective management always starts with recognising the potential danger from power tools. From there, you quantify the exposure and, finally, put targeted controls in place.
Gathering Initial Data
The first phase of any assessment is about collecting the low-hanging fruit—all the information that's readily available. You don't need complex equipment for this, but it forms the backbone of your entire evaluation.
First up, create an inventory of all vibrating tools used on site. For each tool, dig into the manufacturer’s manual or check their website for the declared vibration emission value, which is usually given in metres per second squared (m/s²). Keep in mind these figures are based on ideal lab conditions, but they provide a vital baseline for comparison.
Next, get out on the floor and see what’s actually happening. Talk to your operators; they are your most valuable source of information. Find out which tools they use most often and, crucially, estimate the actual trigger time. This isn't the whole time they're holding the tool, but the total time per day their hands are on it while it's actively running.
Estimating Daily Exposure
Once you have the tool's vibration magnitude and a realistic trigger time, you can work out the daily exposure, known as A(8). This calculation cleverly combines the intensity of the vibration with the duration of use to give you a single, comparable number.
Let's run through a real-world scenario. Imagine a worker in a fabrication shop uses two different tools during their shift:
- An angle grinder with a vibration value of 6.0 m/s² for a total of 1.5 hours (90 minutes).
- An impact wrench with a vibration value of 8.5 m/s² for a total of 30 minutes.
Using an online HAVS calculator or a points-based system, you'd find their combined daily exposure A(8) comes in at around 4.9 m/s². This figure is alarmingly close to the Exposure Limit Value of 5.0 m/s² and well over the Action Value of 2.5 m/s², which is a clear signal that you need to implement control measures urgently.
This kind of calculation is fundamental to knowing where to focus your efforts first. It's a widespread hazard across Australian industries—national surveillance shows that sectors like construction, agriculture, and transport have the highest likelihood of exposure. Common tools like jackhammers, grinders, and impact wrenches frequently push workers over the safe limits, making these initial risk assessments absolutely essential.
When Professional Measurement Is Necessary
These initial estimates are powerful, but they have their limits. There are definitely times when you need to call in the experts for a professional assessment using specialised equipment.
A professional hand-arm vibration assessment becomes critical when you have high-risk tools with no reliable manufacturer data, when work patterns are highly variable and complex, or when an employee begins showing early symptoms of HAVS.
An occupational hygienist will use accelerometers attached directly to the equipment to measure the actual vibration levels as the tool is used in your specific environment. This gives you precise, real-world data that accounts for everything from the tool's condition and the material being worked on to the operator's technique.
This detailed analysis is the gold standard for creating a robust and legally defensible control plan. It ensures you know exactly where your biggest risks lie.
Putting Practical Vibration Controls in Place
Once you've identified the vibration risks on your site, it’s time to take action. This is where we get to the heart of managing and reducing Hand-Arm Vibration (HAV). The most effective way to tackle this is by following the well-established hierarchy of controls, a framework that prioritises the most reliable solutions for eliminating or minimising risk.
This isn't just about ticking a box by handing out anti-vibration gloves. Real, lasting protection starts by changing the work itself, not just shielding the worker from a known hazard. Let's walk through the practical steps you can take, starting with the most powerful engineering solutions and moving through to crucial administrative practices.
Start with Engineering Controls
Engineering controls are physical changes you make to equipment, tools, or the entire work process to cut down vibration at the source. They are, without a doubt, the most effective way to protect your team because they don't depend on someone remembering to do the right thing.
The first question I always ask is: "Can we get rid of this vibrating process completely?" Sometimes, a bit of clever thinking can redesign the task. For instance, can a part be cast or moulded into shape from the start, instead of needing to be ground down later?
If you can't eliminate the task, substituting the tool is your next best move. This means swapping high-vibration equipment for a lower-vibration alternative. When you're buying or hiring new gear, make vibration emission data a non-negotiable part of your decision. A modern tool can often do the same job just as quickly but with a fraction of the vibration, making a huge difference to a worker's daily exposure.
Other powerful engineering controls I've seen work well include:
- Installing anti-vibration mounts: Fitting damping materials or specialised mounts to machinery can isolate the vibration, stopping it from ever reaching the operator's hands.
- Using jigs or mechanical supports: Instead of having an operator press a workpiece against a grinding wheel by hand, could you use a jig or a mechanical arm? This takes their hands completely out of the equation.
- Automating high-vibration tasks: For those highly repetitive, high-exposure jobs, looking into automation can be a fantastic long-term solution that removes the human risk entirely.
Then, Add Smart Administrative Controls
After you've implemented every engineering solution possible, it's time to bring in administrative controls. These are all about changing how people work to limit their exposure time.
A classic example of this is job rotation. Instead of one person operating a jackhammer for four hours straight, why not have four different people each use it for one hour? This spreads the vibration dose across the team, helping keep everyone's daily A(8) value as low as possible.
Here’s a real-world scenario: A site manager needs a concrete slab broken up. A single worker doing the job would be exposed to high vibration for hours. Instead, the manager schedules the task in short bursts, rotating three workers through the job. In between their turns on the jackhammer, they handle non-vibrating tasks like clearing debris or setting up for the next stage. This simple plan ensures no single person gets close to the exposure action value.
Another vital administrative control is enforcing regular breaks. These aren't just for a quick chat and a coffee; they need to be taken away from the vibrating tool to allow blood circulation in the hands and arms to recover. A ten-minute break for every hour spent on a high-vibration tool is a solid, effective rule of thumb.
The Hierarchy of Controls provides a clear roadmap for tackling HAV risks. The table below breaks down this framework with specific, practical examples to help you apply it in your own workplace.
Hierarchy of Controls for Hand Arm Vibration
| Control Level | Description | Practical Examples for HAV |
|---|---|---|
| Elimination | Physically remove the hazard completely. | Redesign the job so a vibrating tool isn't needed (e.g., using concrete crushers instead of breakers, casting parts to size instead of grinding). |
| Substitution | Replace the hazardous tool or process with a less hazardous one. | Swap an old, high-vibration power tool for a modern, low-vibration model. Use a breaker mounted on an excavator instead of a handheld one. |
| Engineering | Isolate people from the hazard by changing equipment or processes. | Install anti-vibration handles on tools. Use jigs, clamps, or suspension systems to hold the workpiece or tool. Automate the process. |
| Administration | Change the way people work to limit their exposure. | Implement job rotation schedules. Enforce mandatory breaks away from vibrating equipment. Provide thorough training on correct tool use. |
| PPE | Protect the worker with Personal Protective Equipment. | Provide certified anti-vibration gloves. Ensure workers wear warm clothing to promote good circulation. |
By working from the top of this hierarchy down, you ensure you're implementing the most effective and reliable controls first, rather than just relying on PPE as a last resort.
The Often-Overlooked Power of Maintenance
Proper tool maintenance is a straightforward but incredibly effective control measure that sits somewhere between engineering and administrative duties. A poorly maintained tool will always vibrate more—often significantly more—than one that's kept in top condition.
Over time, components loosen, bearings wear out, and cutting attachments like grinder discs or chainsaw blades go blunt. When this happens, the tool has to work harder, and that extra effort translates directly into more intense vibration. On top of that, operators tend to grip a blunt or faulty tool more tightly to get the job done, which only worsens the transfer of vibration into their hands and arms.
Here in Australia, guidance from authorities like Safe Work Australia is very clear: managing HAVS exposure is a core duty for any PCBU (person conducting a business or undertaking). Even without a single, specific national legal limit, the expectation under WHS law is that all reasonably practicable controls are put in place. The guidance explicitly points to engineering controls as the first and most important step, as they deliver the most reliable and significant reduction in exposure—something you can measure with the A(8) metric. To get a better handle on the technical side, you can learn more about measuring and assessing hand-arm vibration.
Once you’ve got your engineering and administrative controls dialled in, the next layers of protection are health surveillance and Personal Protective Equipment (PPE). It’s really important, though, to understand where each fits in. PPE, like anti-vibration gloves, is your absolute last resort, not your starting point.
Think of a health surveillance program as your early warning system. It doesn’t control the vibration itself, but it gives you crucial feedback on whether your other controls are actually working. More importantly, it helps you catch the very first signs of Hand-Arm Vibration Syndrome (HAVS) before the damage becomes permanent.

The True Role of Anti-Vibration Gloves
I’ve seen it countless times: a manager thinks that just handing out anti-vibration gloves is enough to solve a vibration problem. This is a common and dangerous mistake. While they can help in very specific scenarios, their effectiveness is often overestimated and misunderstood.
Not all gloves labelled "anti-vibration" do what you think they do. For any real benefit, they must be certified to the ISO 10819 standard. These gloves are designed to dampen high-frequency vibration—the kind you get from grinders or sanders. But here's the catch: they are typically useless against low-frequency vibration from heavy-hitting tools like jackhammers and rock drills.
Relying on PPE alone is a fundamentally flawed approach. Certified gloves might reduce exposure to certain frequencies, but they can also create a false sense of security. Workers might think they’re fully protected and end up using a tool for longer than is safe.
A poor fit can also completely undo any good the gloves might do. If they're too bulky, operators have to grip the tool much harder, which can actually increase the vibration transmitted into their hands and arms.
Building a Robust Health Surveillance Program
A health surveillance program is simply a structured system of health checks for employees exposed to workplace hazards. When it comes to HAV, the goal is twofold: detect any early signs of health issues and collect data to help you see if your risk controls are up to scratch.
You should have a program in place for any worker whose daily vibration exposure is likely to hit or exceed the Exposure Action Value of 2.5 m/s² A(8).
A solid program needs a few key things:
- A Solid Baseline: Before an employee even starts work with vibrating tools, a pre-employment screening is a must. This sets a baseline for their health and flags any pre-existing conditions that could make them more vulnerable to HAVS.
- Regular Check-ins: At-risk workers need scheduled health checks, usually every year. These appointments are all about spotting emerging symptoms and tracking any changes over time.
- Open Lines of Communication: You have to create a workplace where people feel safe reporting early symptoms without worrying about losing their job. Your team is on the front line; they’ll be the first to notice when something feels off.
Identifying the Early Warning Signs
The entire point of health surveillance hinges on spotting the earliest signs of HAVS. This is why educating your team on what to look for is one of the most powerful preventative steps you can take.
The initial symptoms can seem minor—they might even come and go—but they are the first red flags. You can get more details by looking into what are three early signs of HAVS.
The most common early symptoms to watch for are:
- Tingling and Numbness: That classic "pins and needles" feeling in the fingers. It might be more obvious at night or right after a shift.
- Loss of Grip Strength: Finding it harder to do fiddly tasks, like picking up screws or doing up buttons.
- Vibration White Finger: This is the most well-known sign. The tips of the fingers go white or pale, especially in the cold, and then turn a painful, throbbing red as they warm up.
If a worker reports any of these symptoms, they need to be taken off vibration-related work immediately until they can get a proper medical assessment. This is how you stop a temporary problem from turning into a lifelong disability. For workers who develop related conditions like carpal tunnel, which vibration can worsen, additional support like a wrist brace can be a real help. There's a useful guide to finding the best wrist brace for carpal tunnel syndrome that offers practical advice.
Weaving Vibration Management into Your Daily Operations
Tackling hand-arm vibration isn't about a single fix; it’s about building a permanent safety culture. I’ve seen companies treat this as a one-off project, but the reality is that effective management needs to be woven into the very fabric of your daily work. This means shifting from simply reacting to problems to proactively stopping them from happening in the first place.
Two of the most powerful—and honestly, most overlooked—areas for long-term control are your purchasing policies and maintenance schedules. Get these right, and you can slash your team's exposure before a high-vibration tool even hits the worksite.
Smart Buying: A Low-Vibration Procurement Policy
Every time you buy or hire a new piece of equipment, you have a golden opportunity to lower your workplace's overall vibration risk. By creating a formal low-vibration procurement policy, you make safety a standard part of the decision-making process, not an afterthought.
This policy should simply state that vibration emission data is a critical factor in any purchasing decision. When you're looking at new tools, always ask suppliers for their declared vibration values. These are measured under standard conditions, which lets you make a direct, evidence-based comparison between different models and brands.
A solid policy looks something like this:
- Demand the Data: Let suppliers know you require vibration data (in m/s²) for any power tool you're considering. If a supplier can't—or won't—provide this, that should be a major red flag.
- Prioritise Low-Vibration Options: When you have a choice, the tool with the lower vibration emission should be the preferred option, even if it costs a bit more upfront. The long-term savings in your team's health and safety are well worth it.
- Think Beyond the Tool: Don't just look at the tool itself. Ask if there are alternative methods or new technologies that could do the job with less vibration. Sometimes, the best solution is to eliminate the need for a handheld vibrating tool altogether.
Keeping Tools in Top Shape: The Maintenance Schedule
Even the best low-vibration tool will become a serious hazard if it isn't properly maintained. A robust, preventative maintenance schedule isn't just a nice-to-have; it's a non-negotiable part of any serious vibration management program. As parts wear out, bearings loosen, and cutting surfaces get blunt, the tool has to work harder, which translates directly into more vibration.
A worn-out grinder disc or a blunt chainsaw chain doesn't just make the job harder; it significantly increases the vibration dose transferred to the operator's hands. This is a clear and preventable risk that a proper maintenance plan can eliminate.
On top of that, operators tend to grip a poorly performing tool more tightly to compensate, which only makes the transmission of vibration worse. It’s a simple truth: a well-maintained tool is a safer, lower-vibration tool.
A Practical Maintenance Checklist for Your Power Tools
Your maintenance schedule should be tailored to the specific tools you use, but a general checklist is a great place to start. It helps ensure nothing gets missed and that your equipment stays in safe, low-vibration condition. This is also a key part of your responsibility to meet what is the standard for hand arm vibration in Australia.
Here’s a practical checklist you can adapt for your workplace:
- Daily Checks: Are tools visually inspected for damage or loose parts before each use?
- Consumables: Are cutting discs, blades, and drill bits replaced as soon as they become worn or blunt?
- Lubrication: Are moving parts oiled and greased according to the manufacturer's recommendations to cut down on friction?
- Component Security: Are handles, guards, and other components checked regularly to make sure they're secure?
- Anti-Vibration Mounts: If tools have built-in anti-vibration features, are they inspected for wear and replaced when they're past their prime?
- Professional Servicing: Are tools sent for a proper service at the intervals recommended by the manufacturer?
By embedding these procurement and maintenance strategies into your core operations, you create a system that is always working to reduce HAV risk and protect your team for the long haul.
Your Hand-Arm Vibration Questions Answered
When you start digging into Hand-Arm Vibration (HAV), a lot of practical questions pop up. It’s completely normal. This section tackles the most common queries we hear from managers, safety officers, and the workers themselves, giving you straight answers to guide your decisions.
Getting these details right is the key to actually fixing hand-arm vibration problems on your site, not just ticking a box.
Is Every Vibrating Power Tool a Danger?
Not necessarily, but it's more complicated than a simple yes or no. The real risk comes from a mix of two things: the vibration's magnitude (how hard the tool shakes) and the duration of exposure (the total "trigger time" in a day).
Think of it this way: even a tool with relatively low vibration can pose a serious threat if someone is using it for hours on end. That's why we focus on the daily exposure A(8). This single figure combines both magnitude and time, giving you a proper understanding of the day-to-day risk a worker faces.
Can We Just Give Everyone Anti-Vibration Gloves?
I wish it were that simple, but no. Relying on gloves as your main defence is a classic and dangerous mistake. While certified anti-vibration gloves that meet the ISO 10819 standard can offer some protection against high-frequency vibration—the kind you get from grinders or sanders—they have their limits.
They do very little to stop the low-frequency, high-impact vibration from tools like jackhammers or rock drills. Gloves should always be the last resort, used only after you’ve done everything else you can with better tools, work schedules, and processes.
The biggest danger with gloves is the false sense of security they create. A worker might think they’re fully protected and push past safe working times, which ironically puts them at an even greater risk of permanent nerve and circulatory damage.
How Often Do We Need to Do Health Checks?
If any of your team members are likely to be exposed above the Exposure Action Value of 2.5 m/s² A(8), then a structured health surveillance program isn't just a good idea—it's essential. Here’s what that typically looks like:
- A baseline check: This happens before an employee even starts work with vibrating tools. It helps identify anyone with pre-existing conditions that could make them more susceptible.
- Annual screenings: Once they're on the job, a yearly check-up is crucial to catch any early signs or symptoms of Hand-Arm Vibration Syndrome (HAVS).
- Immediate follow-up: If a worker ever reports symptoms—tingling, numbness, or fingers going white and cold—you need to investigate right away.
Think of regular monitoring as your early warning system. It's the best tool you have for preventing a temporary issue from becoming a lifelong injury.
What Exactly Is "Trigger Time"?
Trigger time is one of the most important—and often misunderstood—concepts in HAV management. It’s the actual time a worker's hands are on a tool while it’s actively vibrating. It's not the length of their shift or how long they hold the tool between bursts of work.
Getting an accurate trigger time is absolutely critical because it’s a core part of calculating a worker's daily exposure A(8). If you overestimate it, you could be putting unnecessary restrictions on your team and hurting productivity. Underestimate it, and you're leaving people exposed to dangerous vibration levels without even knowing it. The only way to get this right is to get out on the floor, observe the work, and talk to your operators.
Do I Really Have to Measure Every Tool We Own?
Thankfully, no. Your starting point should always be the vibration data provided by the tool manufacturer. You can use those numbers, along with your own trigger time estimates, to do an initial risk assessment. This will quickly show you which tasks and tools carry the highest risk.
You'll need to bring in a professional with specialised equipment for on-site measurement in a few specific situations:
- You’re using old or modified tools that don't have reliable manufacturer data.
- The manufacturer's data just doesn't seem to match what your workers are experiencing.
- An employee has reported symptoms, and you need a precise, detailed investigation into their specific exposure levels.
Managing Hand-Arm Vibration effectively is an ongoing process, not a one-off project. By building these checks and controls into your standard operations, you’re creating a genuinely safer and healthier workplace for everyone. If you need expert guidance to ensure you're compliant and your workers are protected, the specialists at Anitech Pty Ltd are here to help.
Contact us today to learn more about our comprehensive Occupational Hygiene services.


